

Introduction
The Problem
The Covid-19 Pandemic has modified the means of interpersonal communications. To prevent transmission, everyone is required to wear facemasks when dealing with others. This, in turn, requires businesses to implement health and safety protocols by having to implement a system that detects whether or not a person is wearing a face mask.
The Solution
By the end of this post, you may end up with a solution that can detect whether or not person/s in an image/video are wearing face masks as presented below
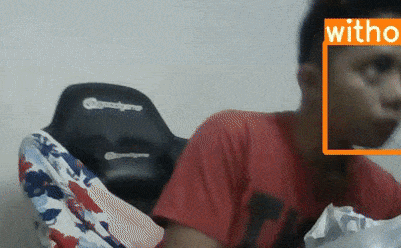 Demo
Demo
Facemask Dataset
This Face mask dataset provides a means to our problem.
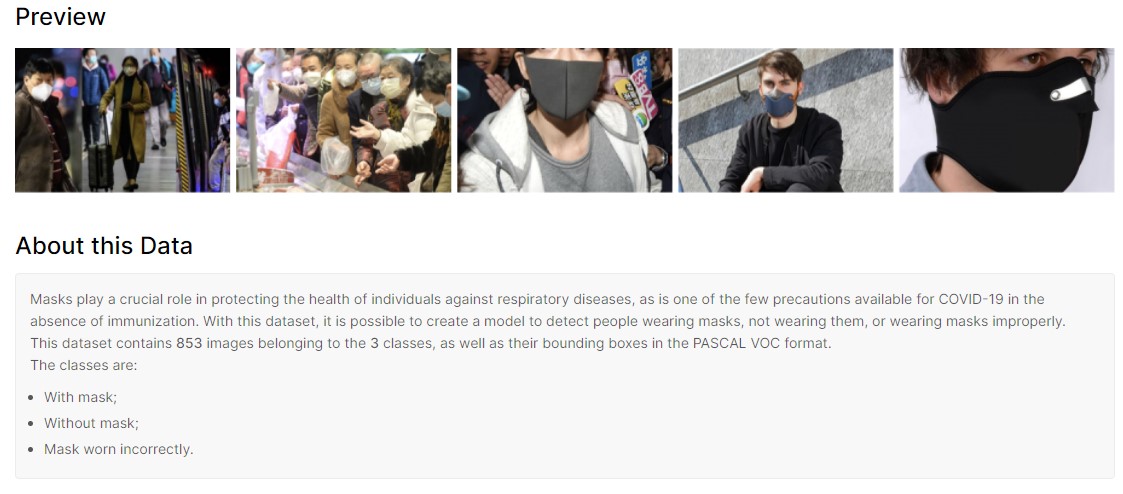 Dataset Preview and Information on Kaggle
NOTE: Domain-specific problems are highly dependent on the quality of the data that you collect and use. Your data must accurately represent conditions on deployment. In this case, if we had to deploy the system on poorly lit areas, then our dataset must include samples under poorly lit conditions; In these cases, you must collect and label your own datasets.
- Download the dataset and extract it to a folder of your choice. I chose a folder named
face_mask
After downloading and extracting your dataset you should have the project structure below:
1
2
3
4
5
6
7
8
9
10
11
📦face_mask
 ┣ 📂annotations
 ┃ ┣ 📜maksssksksss0.XML
 ┃ ┣ 📜maksssksksss1.XML
 ┃ ┣ ...
 ┃ ┗ 📜maksssksksss852.XML
 ┗ 📂images
   ┣ 📜maksssksksss0.png
   ┣ 📜maksssksksss1.png
   ┣ ...
   ┗ 📜maksssksksss2.png
Transforming the data
The preview informs us that the images within the dataset are of PASCAL VOC Format. Other well-known formatting options for Object Detection tasks include COCO, and our target format Yolov5 Format
While we could butt heads scripting out to convert our formats, a handy script, convert2Yolo can do the bulk of the work for us. Read through its common usage to get an understand of how we can split up the files
- Clone the repository and install python dependencies
1
2
3
  $ git clone https://github.com/paulxiong/convert2Yolo.git
  $ cd convert2Yolo
  $ pip install -r requirements
- create a txt file,
names.textat the root offace_maskdirectory with the following content:1 2 3
with_mask without_mask mask_weared_incorrect
These are the labels used inside the PASCAL VOC Format annotations, and will be used to encode the labels into integers
- Create the folder
labels, which will contain the labels in Yolo Format1
$ mkdir labels
- Inside the
convert2Yolorepository, we run the following script to generate1 2
$ cd convert2Yolo $ python3 example.py --datasets VOC --img_path ../images/ --label ../annotations/ --convert_output_path ../labels/ --img_type ".jpg" --cls_list_file ../names.txt
Manually splitting the dataset
Most datasets usually have train and test splits done from the getgo, and mature labelling tools have the capability of exporting samples into splits as well. In our case, we’ll settle in manually splitting our dataset into train and test folders 😜.
Since the dataset consists of 853 images, a usual 90-10 split can be done by manually separating the 85 images into the test folder.
Adding the Object Detection metadata
- Add the file,
data.yamlat the root directory. This will contain the metadata to be used by the object detection library to track the classes and datasets for training. The content of the file will be the following:
1
2
3
4
5
6
7
8
9
train: ./face_mask/images/train/
val: ./face_mask/images/val/

# number of classes
nc: 3

# class names
names: ["with_mask", "without_mask", "incorrecly_worn_mask"]
Resulting Folder Structure
After following the steps, your structure should now look like this
1
2
3
4
5
6
7
8
9
10
11
12
13
14
15
16
17
18
19
20
21
22
23
24
25
26
27
📦face_mask
 ┣ 📂convert2Yolo (no longer needed)
 ┣ 📂annotations (no longer needed)
 ┣ 📂labels
 ┃ ┣ 📂test
 ┃ ┃ ┣ 📜maksssksksss0.txt
 ┃ ┃ ┣ 📜maksssksksss1.txt
 ┃ ┃ ┣ ...
 ┃ ┃ ┗ 📜maksssksksss84.txt
 ┃ ┗ 📂train
 ┃   ┣ 📜maksssksksss85.txt
 ┃   ┣ 📜maksssksksss86.txt
 ┃   ┣ ...
 ┃   ┗ 📜maksssksksss852.txt
 ┣ 📂images
 ┃ ┣ 📂test
 ┃ ┃ ┣ 📜maksssksksss0.jpg
 ┃ ┃ ┣ 📜maksssksksss1.jpg
 ┃ ┃ ┣ ...
 ┃ ┃ ┗ 📜maksssksksss84.jpg
 ┃ ┗ 📂train
 ┃   ┣ 📜maksssksksss85.jpg
 ┃   ┣ 📜maksssksksss86.jpg
 ┃   ┣ ...
 ┃   ┗ 📜maksssksksss852.jpg
 ┣ 📜names.txt (no longer needed)
 ┗ 📜data.yaml
Object Detection using Yolov5
The library, Yolov5 provides a robust system to play around Yolo models. They also provide good tutorials to train on custom data, to train properly and maximize results, and a lot more! It also provides good features, such as model downloading, fine-tuning, logging for training and testing from the getgo.
- Grab the repository and its dependencies using the following commands:
1
2
3
$ git clone https://github.com/ultralytics/yolov5.git
$ cd yolov5
$ pip install -r requirements
Moving our Dataset
You can opt to place the face_mask directory inside the yolov5 root directory to continue following the scripts
Training
Training the model is straightforward with Yolov5. Their wiki provides good insight in further refining and exploring models you can use for the problem. In general, the default parameters for direct training are good enough for training a model that can detect face masks.
- Execute the training script
1
$ python train.py --img 640 --batch 16 --epochs 300 --data face_mask/data.yaml --weights yolov5s.pt
After each training session, the results (logs, charts, checkpoints) are all handled by the repository and saved in the runs/train folder. Yolov5 bundles these charts automatically for you.
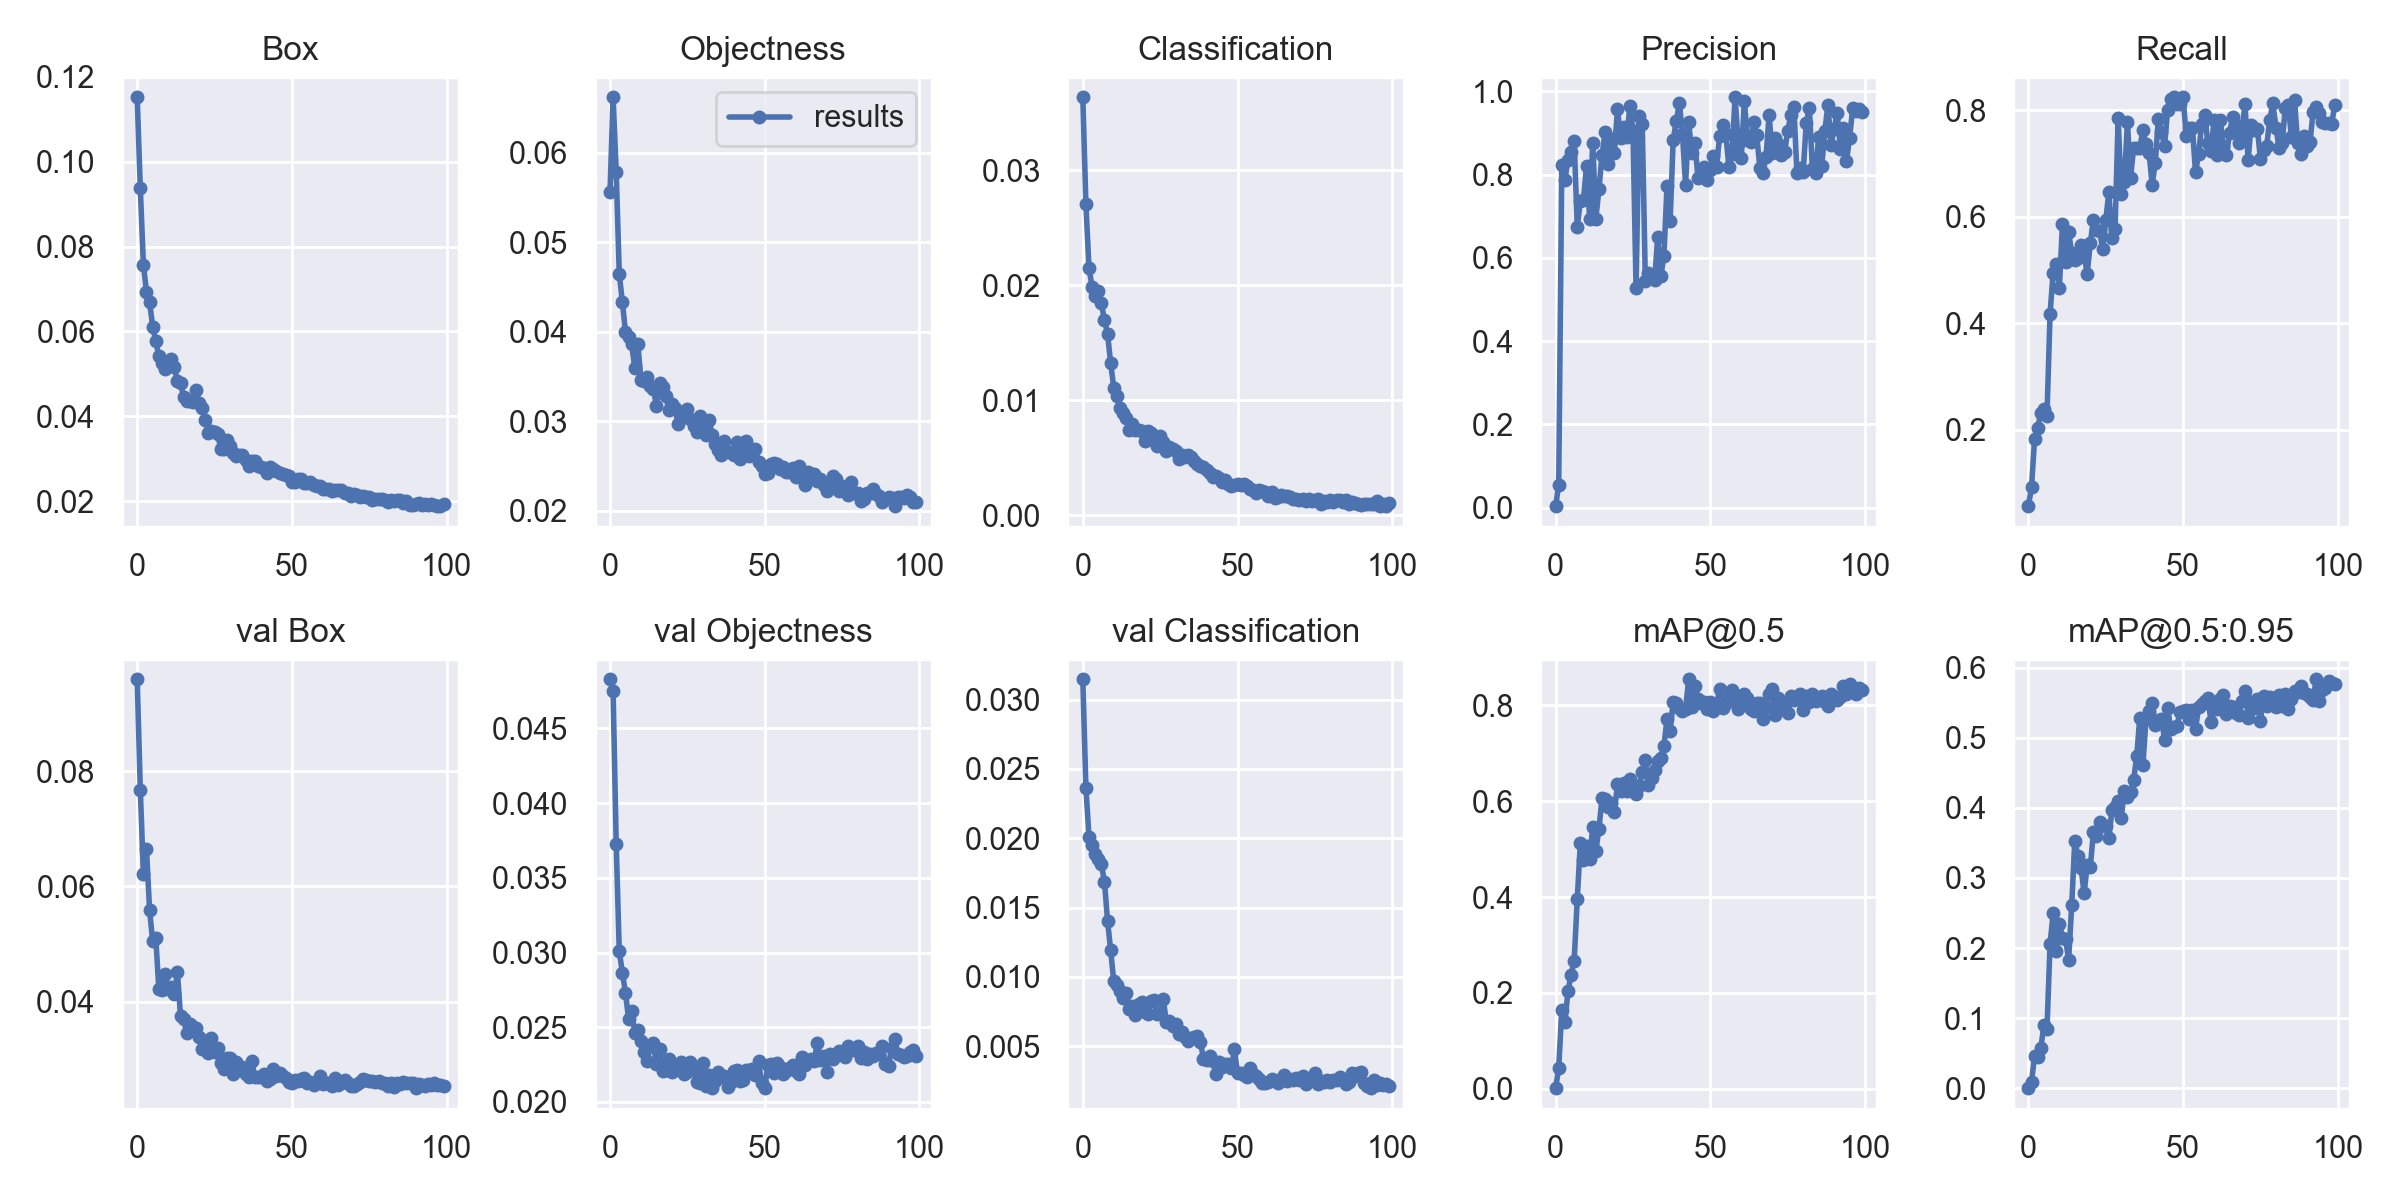 Graph results Logged from training
NOTE: After each session, the results are saved separately through an iterative fashion, under the folder name
expwith an incrementing value for each successive run.
Testing
Testing the model is similarly straightforward. With any webcam you should be able to test out your model, and magically, the repository handles everything for you from execution to logging. Just execute the following script:
1
$ python detect.py --source 0 --weights runs/train/exp/weights/best.pt
Results from the test split are also automatically tested after training. The image below visualizes a mosaic of the tests results evaluated using the trained model
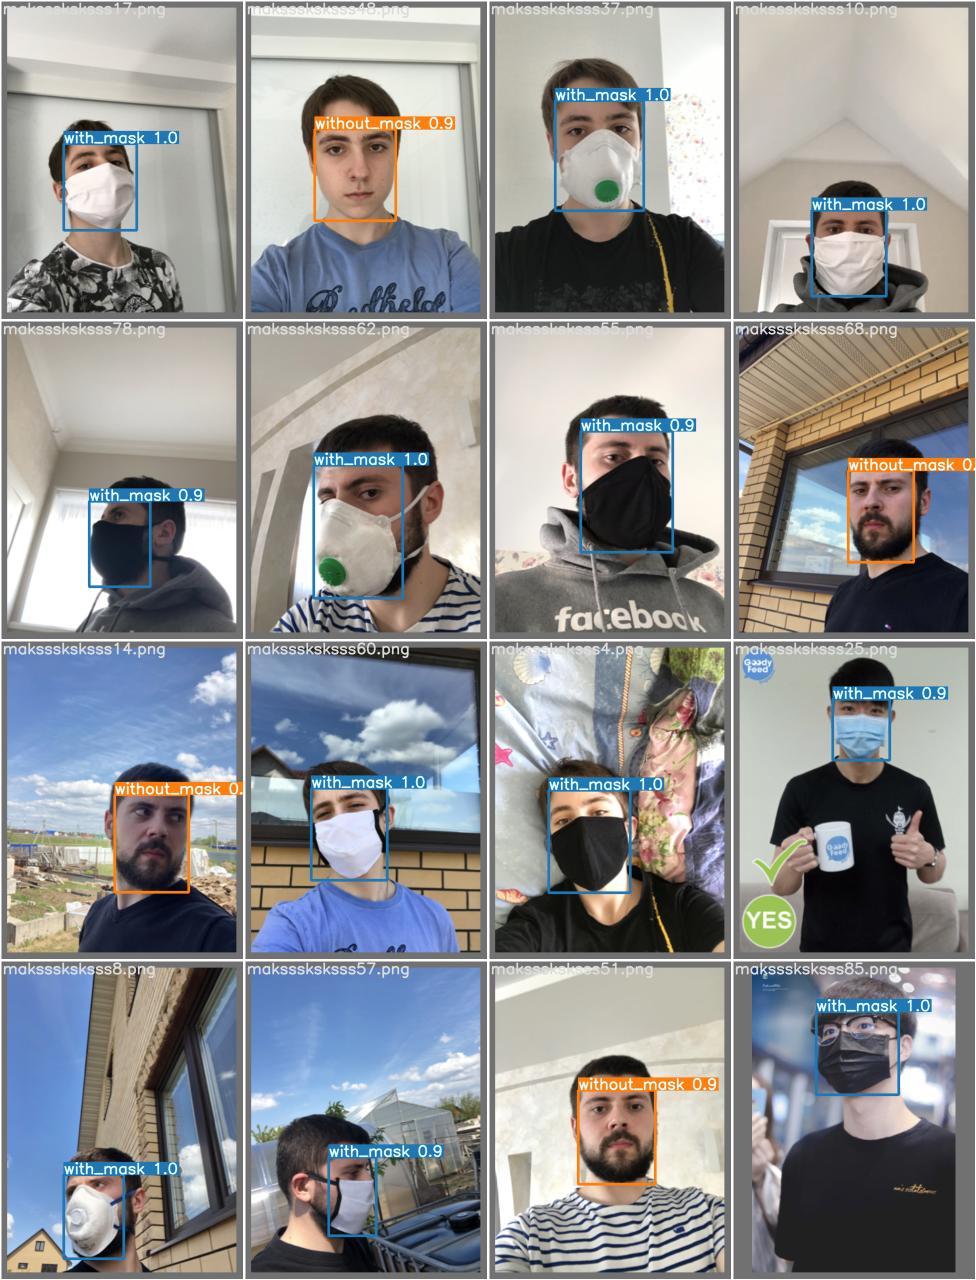 Inference on a batch on the test set
Summary
If you’ve built the face mask detection on your own, congratulations! While you may feel elated to have successfully created a large part of the system, there is still a lot to be done that the post skims off. These are notably:
- Labelling and Augmenting
- Train scripting
- Model architecture building
- Results Interpretation
- Deployment and MLOps
- Many more!
Moving from this
For objective-oriented individuals that have difficulty exploring the ML landscape, as a spring board you may try any of the following:
- Trying out other Computer Vision (Segmentation, Tracking) Tasks for Facemask
- Exiting the Yolov5 crib by templating your own training and testing scripts using other models
- Exporting your model to an api or edge device